
To create your own garage shelves, start by measuring your space and selecting sturdy materials like 2x4s and plywood. Cut, sand, and assemble frames, ensuring everything is square and level. Secure the shelves firmly to wall studs or anchors, adding supports for extra stability. Keep everything organized and maintained over time. If you follow these steps, you’ll maximize storage and create durable, functional shelves—continue to discover detailed tips for a successful project.
Key Takeaways
- Measure your garage and plan shelf placement considering space, weight, and accessibility needs.
- Select durable materials like plywood and 2x4s, and gather necessary tools for cutting and assembly.
- Cut components accurately, then assemble frames with supports and braces, ensuring square and level construction.
- Secure shelves to wall studs or anchors, using screws and brackets for stability and weight support.
- Regularly inspect and maintain shelves, reinforcing as needed for safety, durability, and optimal organization.
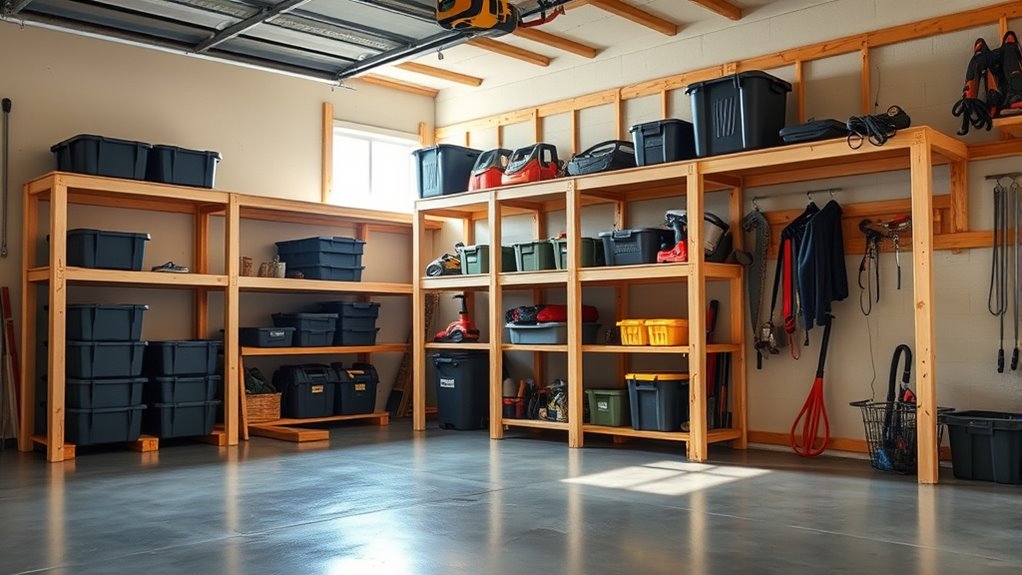
Planning Your Garage Shelving Project
Before starting your garage shelving project, it is vital to plan carefully to guarantee your shelves meet your storage needs and fit your space. Begin by measuring your garage area to determine available wall and floor space. Identify what items you’ll store, noting their size and weight, to decide on appropriate shelf dimensions and weight capacity. Sketch a layout to visualize shelf placement, considering clearance for large equipment or vehicles. Decide whether you want fixed or adjustable shelves, and if you prefer wall-mounted or freestanding units. Establish your budget to choose suitable materials and tools. Proper planning ensures your shelves are functional, durable, and optimized for your garage’s unique layout, saving you time and resources during construction. Additionally, understanding the field of view and imaging scale can help you better assess the space needed for larger equipment or storage items.
Gathering Materials and Tools Needed
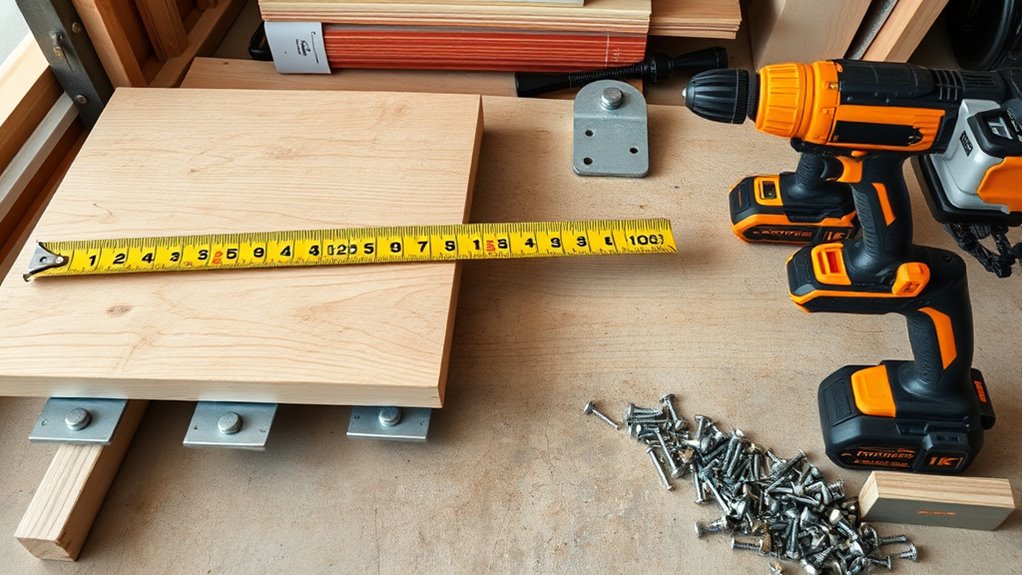
To construct your garage shelves, you’ll need essential tools like a miter saw, drill, measuring tape, and screwdriver. Selecting the right materials, such as sturdy 2x4s and plywood or OSB, depends on your budget and desired durability. Gathering these supplies beforehand guarantees your project runs smoothly and saves you time during construction.
Essential Tools List
Gathering the right tools is vital for building sturdy garage shelves efficiently. You’ll need a miter saw or handsaw for precise cuts of 2×4 lumber and plywood. A drill or screwdriver is essential for driving screws securely into framing and shelf surfaces. Measuring tape and a carpenter’s square ensure your cuts and assembly are accurate and level. A pencil helps mark cut lines and placement points. Optionally, a Kreg jig makes screw placement more precise, improving joint strength. Clamps can hold pieces steady during assembly. If you plan to cut multiple pieces quickly, a circular saw can be helpful. Having these tools organized and ready before starting saves time and guarantees your shelves are both strong and properly aligned. Additionally, understanding projector specifications can help in planning a space that maximizes viewing quality and comfort.
Material Selection Tips
Selecting the right materials and tools is vital for building sturdy, cost-effective garage shelves. Start by choosing 2×4 lumber for supports and frames, focusing on construction-grade or better for strength. For shelf surfaces, pick between plywood, OSB, or particle board, balancing durability and budget. Premium plywood costs more but lasts longer under heavy loads. Measure your space carefully to determine the needed lengths and widths. Tools like a miter saw, drill, measuring tape, and a square are indispensable for accurate cuts and assembly. A Kreg jig can improve screw placement and joint strength. Keep materials organized and ready before you begin. Using quality materials and the right tools ensures your shelves are stable, durable, and capable of handling your garage storage needs. Incorporating architectural solutions can also help optimize space utilization and enhance the overall functionality of your garage storage system.
Cutting and Preparing Lumber and Shelving Surfaces

When selecting materials for your shelves, choose the right type of lumber and surface material to match your budget and load needs. Use accurate cutting techniques with a miter saw or straight edge to make sure of precise dimensions. Proper surface preparation, like sanding and sealing, helps improve durability and creates a smooth finish for your shelving surfaces. Incorporating comparative advantage principles can also guide you in choosing materials that optimize resource efficiency and performance.
Selecting Appropriate Materials
Choosing the right lumber and shelving surfaces is essential for building sturdy, long-lasting garage shelves. You want materials that support weight, resist moisture, and fit your budget. Consider these options:
- Premium plywood: Durable, ideal for heavy loads, but more expensive.
- Standard plywood or OSB: Cost-effective, suitable for lighter items, and easier to work with.
- Particle board or MDF: Less durable, best for light storage, and cheapest option.
Always select quality lumber with straight, smooth grain, and avoid warped or cracked pieces. Measure your space carefully to match shelf length and depth. Preparing materials properly ensures your shelves will stay strong and look professional. Proper selection now saves you trouble later. Additionally, selecting energy-efficient materials can enhance the longevity and sustainability of your shelves.
Accurate Cutting Techniques
Accurate cutting is the foundation of building sturdy, professional-looking garage shelves. To guarantee precise cuts, always measure twice before cutting once. Use a sharp, quality miter saw or circular saw for straight, clean edges. Clamp your lumber securely to prevent shifting during cutting. Mark your measurements clearly, and double-check each line before making cuts. When cutting plywood or OSB, support the sheet fully to avoid splintering or uneven edges. Consider using a speed square or carpenter’s square to verify right angles. Take your time, and avoid rushing through cuts—precision assures your shelves will fit correctly and hold weight effectively. Properly prepared materials lead to a stronger, more durable finished product that looks professional and functions reliably. Embracing artistic expression can also inspire innovative designs and creative solutions in your project.
Surface Preparation Tips
Proper surface preparation is essential to guarantee your garage shelves are strong, stable, and look professional. First, verify lumber and shelving surfaces are clean, free of dust, dirt, and grease. This helps screws and adhesives bond better. Next, sand rough edges and surfaces to smooth out splinters, which prevents injuries and improves appearance. Finally, double-check measurements before cutting to avoid mistakes that could weaken the structure. Key tips include:
- Use a sharp saw for clean, precise cuts
- Sand all surfaces evenly to prevent splinters and improve adhesion
- Always measure twice and cut once to ensure correct dimensions
- Ensure your preparation process aligns with AI tools that can help optimize planning and accuracy.
Assembling the Shelf Frames and Supports
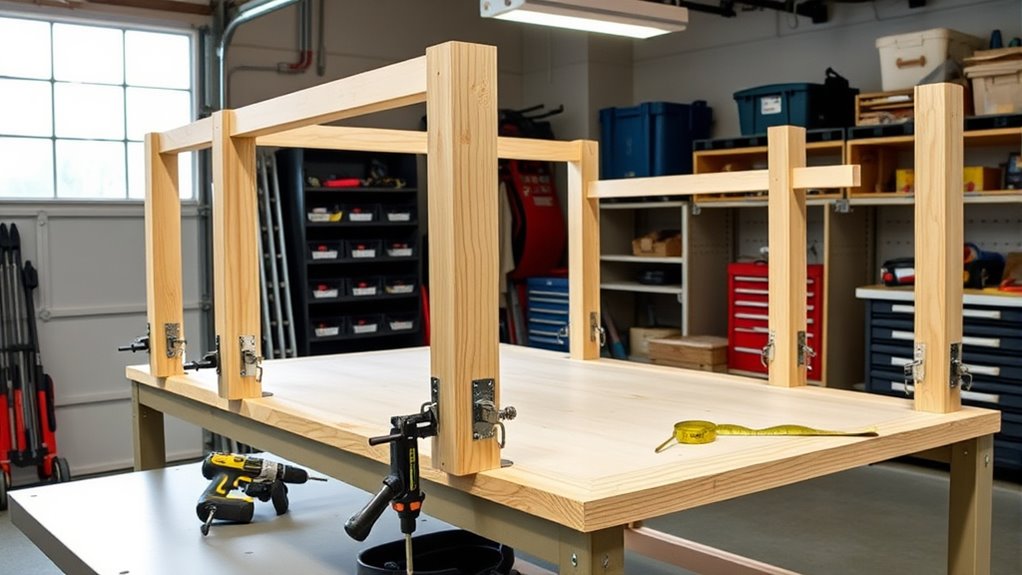
To assemble the shelf frames and supports, start by cutting your 2×4 lumber to the specified lengths for the vertical supports and horizontal braces. Arrange the vertical supports upright on a flat surface, then attach the horizontal braces between them using wood screws. Pre-drill holes to prevent splitting, ensuring the braces are level and square. For added stability, consider using a carpenter’s square during assembly. Repeat this process for each shelf tier, spacing the supports according to your planned shelf height. Use a level to verify that each frame is straight before tightening all screws. If desired, add cross braces or internal supports to strengthen the frame and improve load capacity. Research suggests these additional supports can also help in structural stability and safety. Once assembled, you’ll have sturdy, reliable frames ready for shelving.
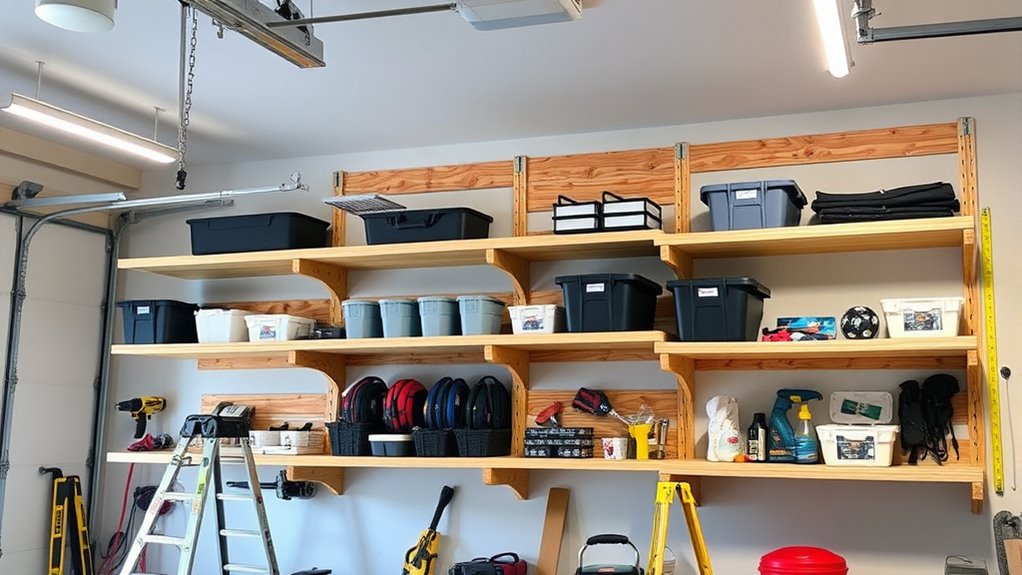
Securing Shelves and Finalizing Installation
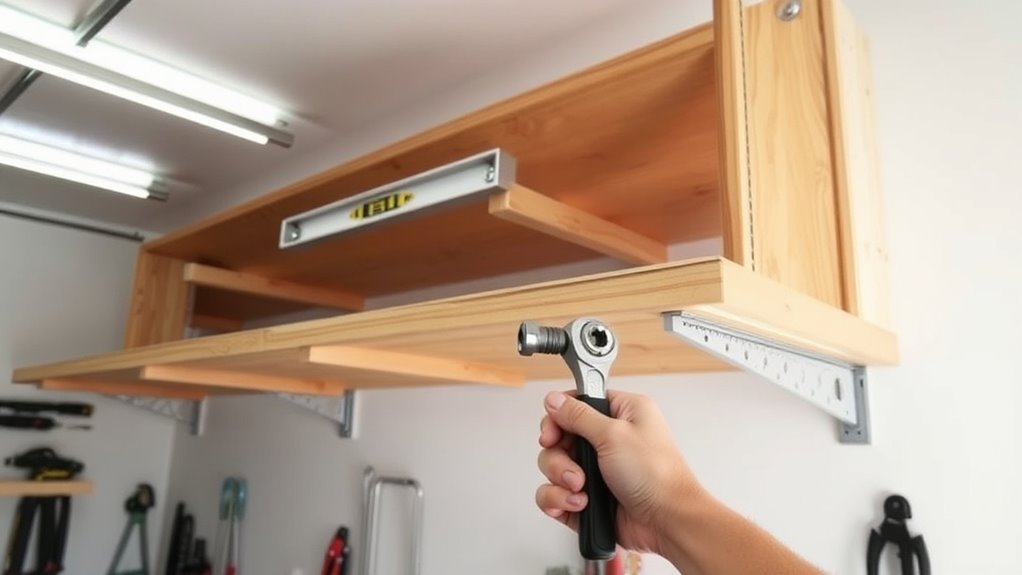
Once your shelf frames are fully assembled, securing them to the wall or floor is essential to guarantee stability and safety. Proper fastening prevents shifting or tipping under load. To do this effectively, verify you have the right anchors and screws for your wall type (concrete, drywall, or studs). Use a level to confirm the shelves are perfectly horizontal before tightening. Consider adding cross braces or L-brackets for extra support. Here are some key tips:
- Attach shelves directly to wall studs using long screws for maximum strength
- Use wall anchors if studs aren’t available, especially for heavier loads
- Double-check that all screws are tight and the unit is level before loading up
- Incorporate quality assurance practices by inspecting the stability regularly to ensure long-term durability
This step ensures your shelves stay secure and durable for years to come.
Tips for Maintaining and Customizing Your Shelves
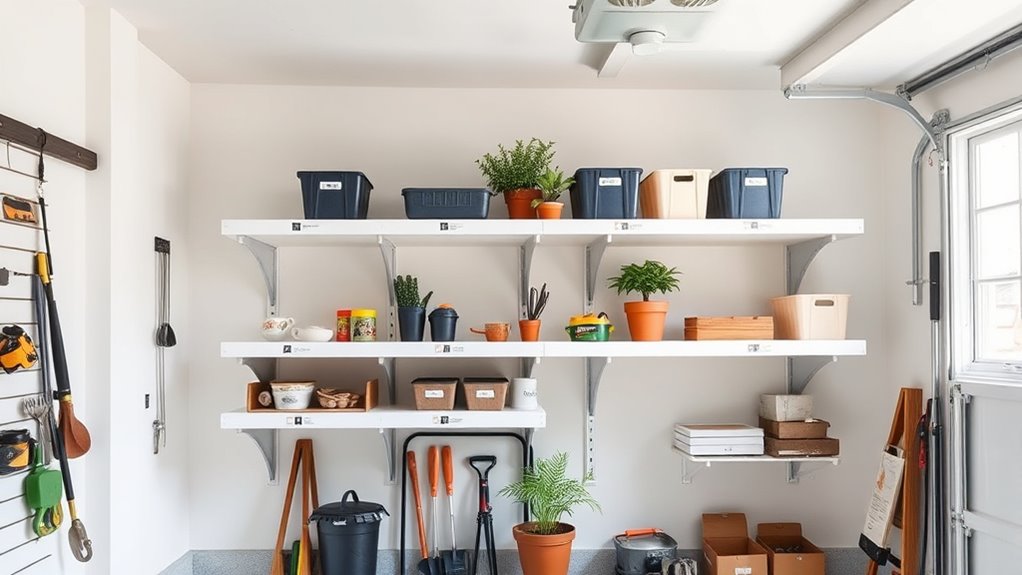
Regular maintenance keeps your garage shelves sturdy and safe over time. Check periodically for loose screws or wobbling supports, tightening them as needed to maintain stability. Inspect for signs of wear, such as splintered wood or sagging shelves, and reinforce or replace damaged components promptly. To customize your shelves, consider adding hooks, bins, or pegboards to maximize storage and organization. You can also adjust shelf heights to better fit your items or add casters for mobility. Painting or sealing the wood helps protect against moisture and extends shelf life. Remember to keep the shelves clean and free of debris, which prevents damage and makes it easier to spot issues early. Proper upkeep and thoughtful customization guarantee your shelves remain functional and tailored to your needs. Organized homes are easier to maintain and provide a calming environment.
Frequently Asked Questions
How Do I Determine the Optimal Weight Capacity for My Shelves?
To determine your shelves’ ideal weight capacity, consider the materials you’re using—premium plywood and sturdy 2x4s can support more weight. Calculate the load based on the shelf size and intended items, then add a safety margin of around 25%. Reinforce with cross braces and secure the shelves firmly to the wall or supports. Regularly inspect and adjust capacity if you notice sagging or stress signs.
What Safety Precautions Should I Follow During Construction?
You should wear eye protection like a superhero donning a shield and gloves like a fortress to prevent cuts and splinters. Keep your workspace clean, avoiding trip hazards that could turn your project into a comic disaster. Use power tools with steady hands, and double-check measurements like a detective solving a mystery. Always follow manufacturer instructions, and work in well-ventilated areas to breathe easy during your construction adventure.
Can I Modify the Design for Adjustable Shelf Heights?
Yes, you can modify your design for adjustable shelf heights. Use cleats or track systems attached to the wall, which let you move shelves up or down easily. Install multiple support brackets at different heights on the sides, so you can customize spacing as needed. This way, you get flexible storage options that adapt to your changing needs, maximizing your garage space efficiently.
What Are the Best Methods to Prevent Shelf Sagging Over Time?
To prevent shelf sagging over time, you should reinforce your shelves with cross braces or internal supports that evenly distribute weight. Use thicker or higher-grade plywood for the surface and attach it securely with screws and wood glue. Adding additional vertical supports or using longer, stronger fasteners also helps. Regularly inspect your shelves for signs of stress, and reinforce or replace any weakened components promptly to maintain their strength.
How Do I Choose the Right Materials for Humid Garage Environments?
Your shelves are about to face a hurricane of humidity, so choose materials that laugh in the face of moisture. Opt for marine-grade plywood or pressure-treated lumber, which resist warping and mold like superheroes. Avoid particle board or regular plywood—they’ll swell and crumble faster than you can say “garage mess.” Using durable, moisture-resistant materials guarantees your shelves stay strong, stable, and looking great in even the dampest, most humid garages.
Conclusion
With your new garage shelves in place, your space will quietly transform into an organized haven. As you enjoy the calm of a clutter-free environment, think of these shelves as the silent guardians of your belongings, patiently holding everything in place. With each item neatly stored, you’ll find a sense of ease and harmony. Embrace this subtle upgrade; it’s your gentle step towards a more serene and functional garage retreat.