Start by repurposing your closet doors into custom shelves for extra storage and style, and build removable shoe racks from reclaimed wood for shoes. Install double rods to increase hanging space and organize clothes by color and type for quick access. Use drawer dividers and folding techniques to maximize space, and add inside-the-door storage for accessories. Affordable containers and labels help keep everything tidy. Keep exploring these ideas to transform your closet on a budget.
Key Takeaways
- Use reclaimed wood and natural materials to create affordable, eco-friendly shelving and shoe racks without professional installation.
- Incorporate modular storage solutions like IKEA cube units with fabric drawers for flexible organization.
- Maximize hanging space with double rods and customize existing rods to define specific wardrobe zones.
- Organize clothes with vertical folding techniques and inexpensive dividers to improve visibility and accessibility.
- Enhance visual appeal by matching shelving styles to decor, adding DIY decorative elements, and repurposing household items.
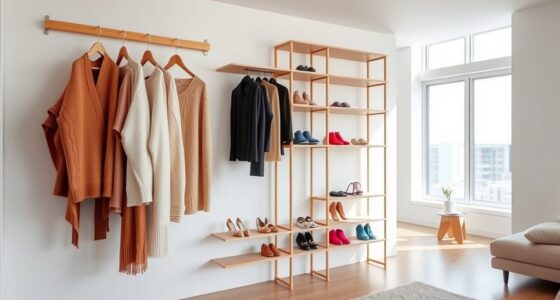
Repurposed Closet Doors for Custom Shelving

Repurposing old closet doors is an affordable and creative way to build custom shelving for your space. You can transform these doors into stylish, functional shelves by removing the panels and attaching them to wall-mounted supports. This method not only saves money but also allows you to match your decor’s aesthetic, whether rustic, modern, or vintage. To guarantee stability, use simple joinery techniques like rabbet or dado joints, which provide strength without complexity. Once assembled, shim the bottom of the shelves to keep them level and secure them firmly to wall studs with three-inch screws. This approach creates personalized storage that’s both practical and attractive, making your closet more organized without the need for costly materials or professional help. Incorporating Free Floating design principles can also enhance the visual appeal and flexibility of your shelving system.
Building Removable Shoe Racks From Reclaimed Wood

Start by choosing reclaimed wood that’s sturdy and fits your closet’s style, ensuring it’s free of nails or rot. Use simple joinery techniques like rabbet and dado joints to create strong, removable racks that hold your shoes securely. Once assembled, customize the size and placement to fit your space, then install the racks with shims and screws for a stable, easy-to-remove solution. Incorporating personal branding elements can also enhance the aesthetic appeal of your DIY closet upgrades.
Selecting Reclaimed Wood Materials
Have you considered using reclaimed wood for building removable shoe racks? Reclaimed wood adds rustic charm and is budget-friendly. Look for sturdy, solid pieces with minimal warping or damage. Pallets, old furniture, or scrap wood from construction sites work well. Check for nails, staples, or splinters and remove them carefully. Choose wood with interesting grain patterns or weathered textures for visual appeal. Confirm the wood is dry and free of mold or pests before use. Reclaimed wood is often thicker and more durable, making it ideal for supporting shoes. When selecting, consider the dimensions you need for your shoe rack design. Using reclaimed wood not only saves money but also gives your project a unique, eco-friendly touch. Additionally, selecting wood with appropriate durability ensures your shoe rack will stand the test of time.
Joinery Techniques for Strength
Using proper joinery techniques is essential to guarantee your reclaimed wood shoe rack is sturdy and durable. To ensure strength, focus on these key methods:
- Dado joints: Cut grooves into the vertical supports and insert the shelves for a flush, secure fit that distributes weight evenly.
- Rabbet joints: Create a stepped cut on the edges of shelves or supports, providing a solid corner connection that resists pulling apart.
- Corner bracing: Add metal or wooden brackets at joints to reinforce stability, especially for heavier shoes or frequent use.
Customizing and Installing Racks
Building a custom removable shoe rack from reclaimed wood is an affordable and practical way to organize your footwear while adding a rustic touch to your closet. First, select sturdy reclaimed wood like pallets or old furniture panels. Use simple joinery techniques such as rabbet or dado joints to create the rack’s shelves and sides. Measure your shoes to determine the appropriate spacing between slats. Cut the wood accordingly and assemble the pieces, securing them with nails or screws. To guarantee stability, shim the base and attach the rack to the closet wall with three-inch screws, making it removable when needed. This project combines resourcefulness with functionality, giving your closet a unique, eco-friendly upgrade.
Installing Double Rod Systems for Increased Hanging Space

Installing double rod systems can considerably boost your closet’s hanging capacity and make better use of vertical space. Proper rod placement is key to keeping your clothes accessible and organized by garment type. By dividing your hanging items effectively, you’ll create a streamlined, functional storage solution tailored to your wardrobe needs. Additionally, ensuring the rods are securely mounted and at appropriate heights can prevent sagging and improve overall durability clothing organization techniques.
Maximizing Closet Capacity
Maximizing your closet capacity becomes straightforward when you add double rod systems, effectively doubling your hanging space in each section. To make the most of this upgrade, consider these tips:
- Prioritize frequently worn items on the upper or lower rods for easy access.
- Group clothing by type or purpose (e.g., workwear on one rod, casual on another) to streamline selection.
- Adjust rod heights to accommodate different garment lengths, maximizing vertical space.
Optimal Rod Placement
Properly placing your closet rods is key to increasing hanging capacity without cluttering the space. Dual rods allow you to maximize vertical space, so install a second rod below the first in sections where you hang shorter items like shirts or blouses. Measure carefully to guarantee enough clearance between the rods—usually about 40 inches from the floor to the bottom rod and 80 inches to the top. Keep enough space for hangers to move freely without crushing clothes. Use a level to ensure the rods are straight, and secure them into wall studs with sturdy screws for stability. If your closet is wide, consider installing multiple double rod sections to create a streamlined, efficient wardrobe that doubles your hanging space. Sturdy installation ensures your rods will hold up over time and prevent accidents or damage.
Organizing by Garment Type
Organizing your closet by garment type makes it easier to find what you need quickly and keeps your space tidy. Installing double rod systems maximizes hanging space and improves organization. Here’s how to get started:
- Measure your closet section to determine the ideal rod height for different garments.
- Reposition or cut existing rods to fit your needed zones, using hacksaws or angle grinders.
- Install a second rod below the existing one, securing it to wall studs with sturdy three-inch screws.
- Incorporate energy-efficient components and fixtures to ensure your closet upgrades align with sustainable practices.
Organizing Clothes by Color and Type for Easy Access

Sorting your clothes by color and type makes your closet more functional and easier to navigate. When you group similar items together, you’ll quickly find what you’re looking for and streamline your outfit choices. Use hangers or bins to separate clothing categories like shirts, pants, and dresses, and organize them by color from light to dark. This visual consistency helps you spot mismatched pieces and keeps your wardrobe tidy. Consider the following organization idea:
| Clothing Type | Colors |
|---|---|
| Shirts | White, Blue, Red |
| Pants | Black, Khaki, Navy |
| Dresses | Pastel, Bright, Neutral |
This method simplifies access and maintains a clean, cohesive look in your closet. Additionally, understanding the biological classification of your clothing materials can help in choosing appropriate cleaning and storage methods.
Using Drawer Dividers and Folding Techniques to Maximize Space

Maximizing drawer space starts with smart folding techniques that keep your clothes neat and accessible. Using drawer dividers helps you organize items by category, making it easier to find what you need quickly. With space-saving storage solutions, you can fit more in each drawer and maintain a clutter-free closet.
Optimized Folding Methods
Using effective folding techniques combined with drawer dividers can substantially increase your closet’s storage capacity. To maximize space, focus on three key strategies:
- Fold clothes uniformly: Use consistent folding methods like KonMari or the roll technique to create neat, compact stacks. This prevents items from toppling over and makes stacking easier.
- Utilize drawer dividers: Segment your drawers into sections for different categories—tanks, underwear, workout gear—to keep everything organized and visible.
- Stack vertically: Fold items into small, flat rectangles and stack them vertically rather than horizontally. This way, you can see every piece at a glance, making retrieval quick and effortless.
These methods optimize space and streamline your wardrobe management.
Effective Drawer Segregation
Organizing your drawers with effective dividers and folding techniques can transform clutter into a streamlined system. Use inexpensive drawer dividers or repurpose small boxes to create dedicated sections for different clothing categories, like underwear, socks, or t-shirts. Folding clothes uniformly, such as with the KonMari method, maximizes space and keeps items visible. Stacking folded garments vertically to see everything at a glance reduces the need to dig through piles. Assign specific drawers for specific items, making it easier to locate what you need quickly. Keep similar items together, and regularly reassess your organization system to guarantee it remains functional. Incorporating passive voice detection in your editing process can help make your instructions clearer and more direct. With simple dividers and thoughtful folding, your drawers become more accessible, tidy, and efficient—saving you time and reducing stress during your daily routine.
Space-Saving Storage Solutions
To make the most of your drawer space, incorporate dividers and adopt efficient folding techniques that keep items neat and accessible. Using dividers helps categorize your clothes, preventing clutter and making it easier to find what you need. Efficient folding techniques maximize space by reducing bulk and creating uniform stacks. Consider these three tips:
- Use adjustable drawer dividers to customize compartments for different items like underwear, socks, or accessories.
- Fold clothes vertically following the KonMari method to see all items at a glance and save space.
- Group similar items together—such as workout gear or T-shirts—for quick access and better organization.
- Incorporating visual cues and auditory feedback techniques can further enhance your organizational habits, making your closet easier to maintain over time.
Implementing these solutions helps you maintain a tidy, functional wardrobe with minimal effort.
Creating Modular Storage With Budget-Friendly Cube Units

Looking for an affordable way to upgrade your closet storage? Modular cube units, like IKEA’s Kallax, are perfect for this. They’re budget-friendly, versatile, and easy to assemble. You can stack multiple units to customize your storage space, creating compartments for clothes, shoes, and accessories. Adding fabric drawers or boxes inside the cubes keeps smaller items organized and hidden from view. These units don’t require removing existing shelving, so you save time and money. Plus, they fit into various closet layouts, whether you want a standalone system or to combine with existing storage. For an even neater look, use labels or color-code fabric boxes for different categories. With these simple upgrades, you’ll maximize your closet’s capacity without breaking the bank. Discover Home Decor Inspiration and Interior Design Tips
Inside-the-Door Accessory Storage Solutions

Maximizing closet space often means thinking beyond shelves and drawers. Inside-the-door accessory storage solutions make this possible. You can easily add:
- Hook racks on cabinet doors for belts, scarves, or jewelry.
- Small pocket organizers to keep necklaces, earrings, or watches visible.
- Magnetic strips for pins, clips, or metal accessories.
- Incorporating smart organization techniques can further enhance your closet’s efficiency and accessibility.
These options keep your accessories accessible without cluttering shelves or drawers. Installing hook racks is quick and inexpensive, and they work well for daily essentials. Small pocket organizers hang neatly inside doors, making it easy to find your items. Magnetic strips hold metal accessories securely, preventing loss. Using these simple solutions guarantees your accessories stay organized and within reach, freeing up space in the main closet area.
Utilizing Affordable Containers and Baskets for Seasonal Items

Affordable containers and baskets are essential tools for organizing seasonal items without breaking the bank. They help you separate out-of-season clothing, accessories, or footwear, making your closet more manageable. Use fabric bins from stores like Walmart or mesh bags from Dollar Tree to keep lightweight items grouped together. Clear plastic containers allow quick visibility, so you know exactly what’s inside without rummaging through piles. Stackable baskets save space and can be labeled with affordable tags or masking tape for easy identification. Reusing existing containers or repurposing baskets from other areas adds an eco-friendly touch while cutting costs. Additionally, understanding the horsepower of electric dirt bikes can inspire you to select storage solutions that accommodate heavier or bulky seasonal gear. By selecting inexpensive, versatile storage options, you can keep your seasonal wardrobe organized, accessible, and clutter-free all year round.
Enhancing Visibility With Chalkboard Paint and Labeling

Ever struggled to quickly find accessories or small items in your closet? Enhancing visibility with chalkboard paint and labeling makes a big difference. First, paint a section of your closet wall or inside cabinet doors with chalkboard paint to create a reusable surface for notes and labels. Second, use chalk or chalk markers to write clear labels for bins, shelves, or sections—think “Belts,” “Scarves,” or “Jewelry.” Third, update labels easily by erasing and rewriting as your collection or organization system evolves. This approach keeps everything visible and accessible at a glance. Plus, it’s budget-friendly and customizable to fit your space. By integrating chalkboard paint and labels, you streamline your storage and make finding what you need effortless.
Upcycling Existing Hardware for Cost-Effective Storage

Repurposing your existing hardware is a smart way to save money and add unique touches to your closet organization. Instead of buying new fixtures, look around for items you already have, like hooks, brackets, or old drawer pulls. You can paint or clean these pieces to match your decor, giving them a fresh look. For example, sturdy hooks can hold scarves, belts, or jewelry, while old brackets can become makeshift shelving supports. Cutting and repositioning existing clothing rods or repurposing cabinet hardware can create custom storage solutions tailored to your needs. By upcycling what you already own, you reduce waste and keep costs low, all while adding personality and functionality to your closet space. Incorporating traditional practices can also inspire creative ways to utilize natural materials and sustainable methods in your DIY upgrades. It’s an efficient way to upgrade without breaking the bank.
Frequently Asked Questions
How Do I Measure and Cut Closet Rods Accurately for Different Lengths?
To measure and cut closet rods accurately, start by using a tape measure to determine the desired length, accounting for any brackets or supports. Mark the cut point clearly with a pencil. Use a hacksaw or angle grinder for precise cuts, applying steady pressure. Double-check your measurements before cutting, and sand any rough edges afterward to prevent snagging. This guarantees a perfect fit and a clean, professional look.
What Safety Precautions Should I Follow When Using Power Tools Like Angle Grinders?
Using power tools like angle grinders can be as dangerous as handling a wildfire, so safety should be your top priority. Always wear safety goggles and a dust mask to protect your eyes and lungs. Keep your hands clear of the blade and work in a well-ventilated area. Make sure the tool is unplugged when changing blades or adjusting, and follow the manufacturer’s instructions carefully to avoid accidents.
How Can I Reinforce DIY Shelving to Hold Heavier Items Securely?
To reinforce your DIY shelving for heavier items, first use sturdy materials like thick plywood or reclaimed wood. Employ rabbet and dado joinery techniques for strong connections. Shim the shelves at the bottom to keep them level, and secure them to wall studs with three-inch screws for maximum support. Additionally, add metal brackets or braces underneath the shelves for extra reinforcement, ensuring they can safely hold heavier loads.
Are There Specific Types of Reclaimed Wood Best Suited for Shoe Racks?
You should choose hardwoods like oak, maple, or birch for your shoe racks, as they’re durable and resistant to wear. These woods can handle the weight of multiple pairs of shoes without warping or cracking. Avoid softwoods like pine or cedar, which may bend or break under pressure. Always sand and seal the wood properly to extend its lifespan and guarantee a sturdy, long-lasting shoe storage solution.
How Do I Prevent Moisture Damage to Repurposed Wood and Existing Hardware?
To prevent moisture damage to your repurposed wood and hardware, you should seal the wood with a waterproof finish like polyurethane or a marine-grade sealant. Keep your closet dry by controlling humidity with dehumidifiers or ventilation. Regularly inspect hardware for rust and clean or replace as needed. Avoid placing your wood in damp areas and consider elevating shelves slightly to prevent direct contact with moisture.
Conclusion
With these budget-friendly closet upgrades, you’ll transform your wardrobe into a well-organized sanctuary that rivals boutique displays. Say goodbye to chaos and hello to effortless elegance—your clothes will practically dance into perfect order. In no time, your closet will become the envy of all who see it, elevating your space from cluttered chaos to a masterpiece of organization. Get ready to impress yourself—and everyone else—with your stunning, streamlined closet!