
TL;DR
Placing your rig in a closet can dramatically cut noise and reflections. Focus on proper placement, sealing gaps, and ventilation to get clean, professional sound without relying solely on foam or costly treatments.
Imagine turning a tiny closet into a vocal booth or a high-quality audio workspace. It’s possible—and surprisingly simple—if you focus on where you place your gear, how you treat the surfaces, and how you handle airflow. The biggest mistake? Relying only on foam to muffle sound. That’s like trying to hide a fire with a blanket. Instead, the real game-changer is distance, sealing gaps, and proper ventilation. Here’s what you need to know to make your closet rig sound clear, warm, and professional.
Whether you’re recording vocals, streaming, or running a small AI inference server, your setup’s success hinges on these three pillars: placement, acoustic dampening, and airflow. This guide walks you through concrete steps, real-world examples, and common pitfalls—so you can build a closet studio that’s quiet, cool, and acoustically tuned.
Acoustic dampening
& the rig in the closet.
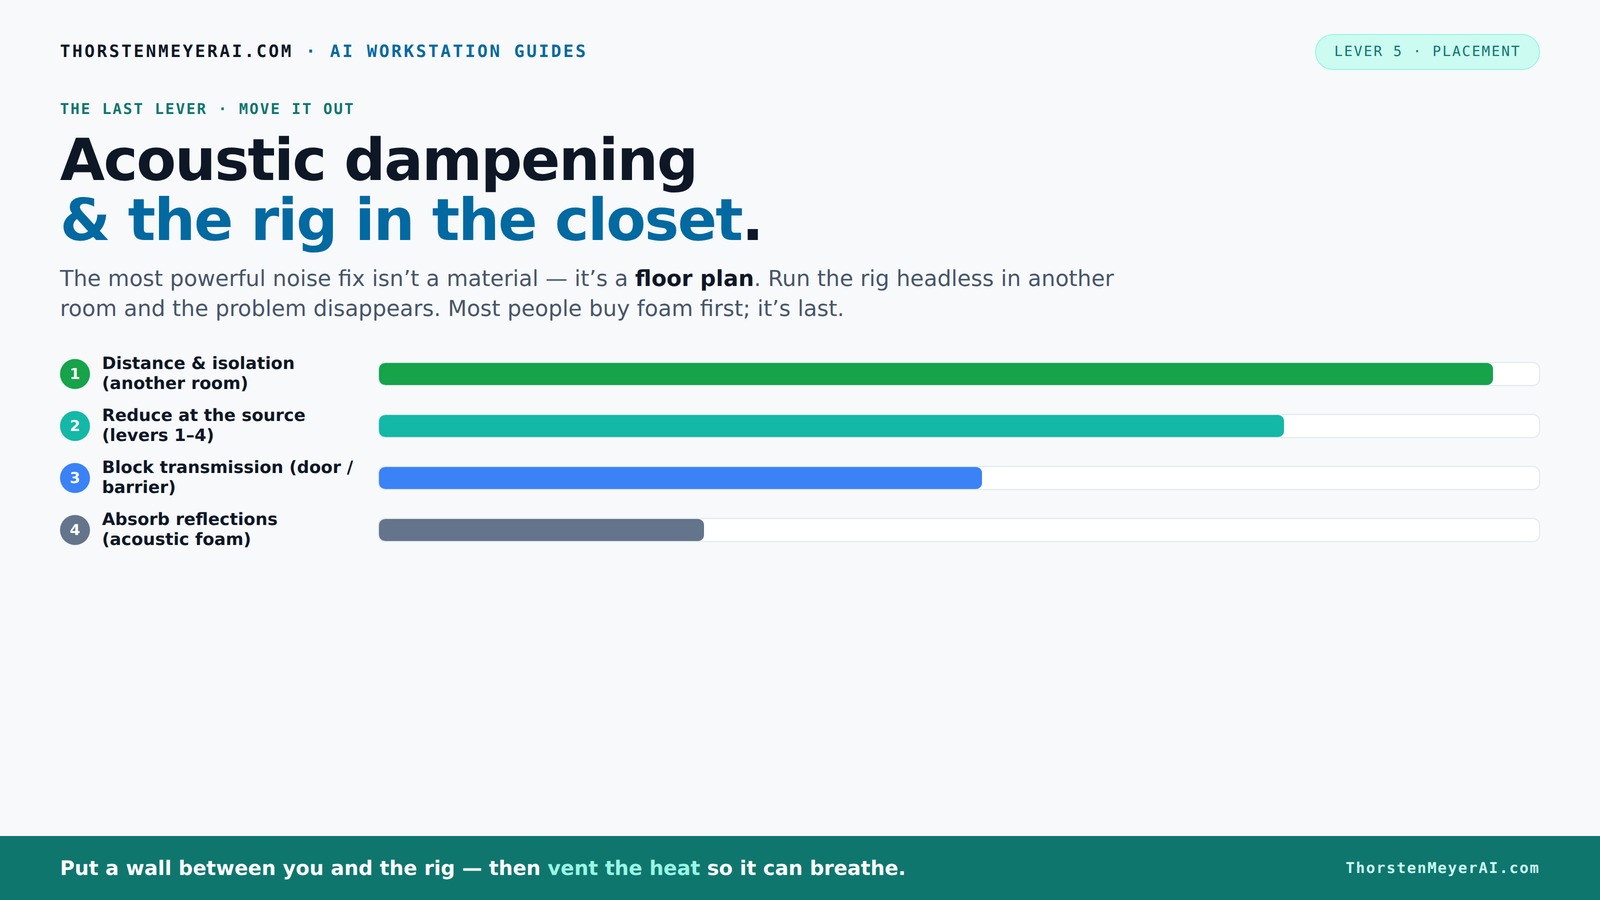
The most powerful noise fix isn’t a material — it’s a floor plan. A rig you can’t hear because it’s in another room beats any amount of foam. Tap the approaches in Part 1 to see what actually works.
(another room)
(levers 1–4)
(door / barrier)
(acoustic foam)
Contain the noise, not the heat
Key Takeaways
- Placing your rig in another room or closet keeps noise away from your workspace more than foam or barriers.
- Proper ventilation is critical—use active airflow or purpose-built soundproof cabinets to prevent overheating.
- Treat reflection points directly around the mic with absorption panels or blankets, not just corners.
- Seal all gaps, cracks, and doors to stop sound leaks, using weatherstripping and acoustic sealant.
- Combine surface treatment, placement, and ventilation for a balanced, professional closet studio.

Portable Recording Booth for Home Studio, Soundproof Vocal Booth with Travel Bag for Voiceovers, Podcasts, Streaming and Music Recording
【Superior Sound Isolation for Clean Takes】: Durable oxford fabric with multi-layer acoustic pads helps absorb up to 90%...
As an affiliate, we earn on qualifying purchases.
As an affiliate, we earn on qualifying purchases.
Why Moving Your Rig is the Easiest Sound Solution You’ll Ever Find
The best way to cut noise and reflection? Put your rig in another room. Just like a loudspeaker in a closet sounds quieter outside, moving your gear into a closet or basement instantly reduces noise at your desk. For AI workstations, you don’t need the rig next to you. You SSH or API into it—so why have it in the same room? Placing your machine in a different room or closet makes the noise vanish from your workspace.
Two things matter: a fast wired network connection and good ventilation. Without airflow, trapped heat will turn your closet into a sauna—bad for your hardware and your noise goals. So think of this strategy as a noise shield, not just a convenience. You get silence at your desk while the rig roars in the background, out of sight and earshot.
Beyond reducing noise, this separation also minimizes acoustic reflections that bounce around the confined space, which can muddy recordings or streaming audio. The tradeoff? You need reliable network access and proper ventilation to prevent overheating. But the payoff is a much cleaner, quieter environment that doesn’t compromise your hardware’s longevity or your audio quality.
![Ekkogo Acoustic Panels 12-Pack Soundproof Wall Panels 12"X10.4"X0.4" Sound Panels High Density Sound Dampening Panels - [Light Turquoise Hexagon]](https://m.media-amazon.com/images/I/51fcGFHNliL._SL500_.jpg)
Ekkogo Acoustic Panels 12-Pack Soundproof Wall Panels 12"X10.4"X0.4" Sound Panels High Density Sound Dampening Panels - [Light Turquoise Hexagon]
【HIGH DENSITY ACOUSTIC PANELS】: Improve sound quality and reduce echoes & reverb at your home, office, podcast studio,...
As an affiliate, we earn on qualifying purchases.
As an affiliate, we earn on qualifying purchases.
How to Ventilate a Closet Rig Without Turning It Into a Sauna
Placing a hot, high-load machine in a sealed closet is a recipe for overheating. The key is to add ventilation. Think of it like a tiny room with a window—hot air escapes, cool air comes in. A passive vent or a small exhaust fan can do wonders. For more serious setups, consider a purpose-built soundproof cabinet with ducted airflow and thermostatic control. These units combine insulation with active cooling, keeping noise low while preventing heat buildup.
Proper ventilation isn’t just about comfort; it’s about preserving your hardware’s performance and lifespan. Overheating can cause thermal throttling, reduce component life, or even lead to hardware failure. For detailed ideas, see how to reduce heat and noise in a high-power AI workstation. Proper ventilation is a critical part of your acoustic strategy, ensuring your setup stays cool, quiet, and reliable.
Don’t forget to regularly monitor the temperature inside your closet. If it exceeds 85°F (29°C), your hardware may start to throttle or suffer damage. Implementing thermostatic control and choosing low-noise fans can strike the right balance between effective cooling and acoustic silence. For detailed ideas, see how to reduce heat and noise in a high-power AI workstation. Proper ventilation is a critical part of your acoustic strategy, ensuring your setup stays cool, quiet, and reliable.

8" Room to Room Fan with Remote, Reversible Through Wall Fan for Quietly Circulating Air, 320 CFM Through the Wall Fan with Temperature Control, Durable Build Quality, In Wall Fan for Closet, Laundry
【QUIET, MOVE MASSIVE AIR】 This room to room fan quietly circulates air between two rooms to maintain a...
As an affiliate, we earn on qualifying purchases.
As an affiliate, we earn on qualifying purchases.
Acoustic Dampening in Small Spaces: More Than Just Foam
Acoustic dampening isn’t about blocking sound completely—it’s about reducing echo, harshness, and reflections inside a small space. A closet can be treated with blankets, foam panels, or even thick curtains. But the real trick is placement: treat the reflections where they happen most. For example, if your mic is near a hard wall, adding absorption directly behind or beside it makes a big difference.
Understanding why placement matters helps you optimize your dampening efforts. Hard surfaces like walls and ceilings reflect sound waves, creating reverberations that make recordings sound boxy or muddy. By strategically placing absorption materials at these reflection points—such as behind the mic or on the ceiling—you disrupt these echoes at their source. This targeted approach reduces the need for excessive treatment and preserves the natural tone of your audio.
In small closets, the typical approach is to place thinner foam on the ceiling and walls to absorb high frequencies, and thicker panels or bass traps for low end. Rugs or carpets on the floor also cut down on bouncing sound. The goal? Make the space sound less like a box and more like a controlled environment. Keep in mind: over-treating can deaden the sound too much, so aim for a balanced approach that retains some liveliness while controlling problematic reflections.
Remember: surface treatment is most effective when targeted. For example, surround the mic with absorption panels and treat the main reflection points—these are the spots your mic “hears” most strongly. Consider the room’s shape and the placement of your gear to identify the critical reflection points for maximum impact.
For detailed advice, check out how treat small rooms for sound. The right combination of surface treatment and placement turns a whispering closet into a professional studio.

Audimute Soundproofing Acoustic Door Seal Kit - Door Sweep and Seal - (Large Size)
Includes (2) Door Seals (3/16" x 1/2" x 50') and (1) Door Sweep (1/2" x 1.5" x 25').
As an affiliate, we earn on qualifying purchases.
As an affiliate, we earn on qualifying purchases.
The Truth About Foam, Corners, and Bass Traps in a Closet
Foam panels are great for controlling high frequencies but do little for bass buildup or low-end resonance. For a small closet, thin foam (1-2 inches thick) helps tame the high mids and highs, but if you notice booming lows or resonance, thicker panels or bass traps become essential.
Many creators make the mistake of overusing foam or focusing only on corners. While corners are hotspots for bass traps, treating just the corners won’t fix a room’s low-frequency issues if the walls are parallel and reflective. Instead, consider broad absorption panels or diffusers that cover larger wall areas. These help break up standing waves and reduce muddiness in your sound.
For low-end problems, dense materials like mineral wool or specialized bass traps are best. They absorb or diffuse sound waves that bounce back and create muddiness. When in doubt, measure your room’s response to identify whether low frequencies are the culprit, then add treatment accordingly. Remember, the goal is to balance absorption across the frequency spectrum without deadening your space excessively.
Find out more about effective low-frequency treatment at room treatment options.
Sealing Gaps and Doors: The Hidden Sound Leaks in Your Closet
Sound leaks through tiny cracks, gaps, and unsealed doors. Even a small opening around your closet door can let in or out enough sound to ruin your setup. The fix? Seal everything. Weatherstripping, acoustic sealant, and door sweeps are your friends.
For example, a creator found that sealing the gap around their closet door with weatherstripping cut sound leaks by over 80%. Outlets, vents, and cracks around the frame also need attention. Use acoustic caulk or foam sealant on these spots.
Keep in mind: a well-sealed closet isn’t just about soundproofing; it also helps with thermal regulation, keeping your equipment cooler and your noise lower. Sealing gaps prevents external noise from entering and internal sound from escaping, creating a more controlled environment. The tradeoff? If not done carefully, sealing can make access more difficult, so plan for easy removal if needed. Prioritize sealing the biggest leaks first for maximum impact.
Read more about effective sealing at soundproofing tips for closets.
DIY and Portable Solutions for a Closet Rig That Works
Many creators prefer lightweight, removable solutions over permanent construction. Hanging blankets or moving panels with autopoles lets you transform a closet into a studio on demand. This flexibility is especially handy if you share your space or move often.
For example, hanging thick blankets around the microphone or attaching foam panels to the ceiling can dramatically improve acoustics without drilling or building. Using portable bass traps or reflection filters further enhances sound quality. These DIY solutions are inexpensive, fast, and reversible.
When setting up, focus treatment on the reflection points and around the mic. Keep enough space for hardware and airflow. This way, you get a professional sound without permanent modifications. Keep in mind that while portable solutions are convenient, they may not achieve the same level of absorption as permanent treatments. Strategically placing them at the right points maximizes their effectiveness while maintaining flexibility.
Explore options at DIY closet studio ideas.
Frequently Asked Questions
Is acoustic foam enough for a closet studio?
Acoustic foam helps reduce reflections and echo inside the space, but it doesn’t block sound from leaking out or in. For full sound isolation, sealing gaps and adding barriers are necessary alongside foam treatments.Where should I place acoustic treatment first?
Start behind and directly around the microphone, especially at the main reflection point. Then treat side walls, ceiling, and floor as needed for more even sound control.Do I need bass traps in a closet?
Yes, especially if you notice low-end resonance or booming sounds. Thick panels or bass traps placed at reflection points help tame bass buildup caused by parallel walls and small room dimensions.What thickness of panels should I buy?
For small closets, 1-2 inch panels work well for high frequencies. If low-end issues are present, consider 4-inch or denser panels for better absorption of bass frequencies.How do I keep the closet from sounding 'boxy'?
Use absorption on reflective surfaces, avoid sticking to only corners, and add soft materials like rugs or blankets. Proper placement reduces echo and makes your space sound more natural.Conclusion
Moving your rig into a closet isn’t just about hiding noise—it’s about smart placement, sealing, and airflow. When you treat the reflections and prevent heat buildup, your small space turns into a quiet, professional-grade studio. It’s not about expensive foam or fancy gear; it’s about thinking carefully about where and how you treat your space.
Remember: the best soundproofing is distance and ventilation. Focus on these, and your closet becomes a powerhouse of clean, controlled audio—no matter how loud your rig roars.